Visualizzazione post con etichetta TUTORIAL. Mostra tutti i post

martedì 30 aprile 2013

Painting panda eyes: a short tutorial

I have been asked to explain how I shade my creations. I took some pictures while doing the eye patches on my latest creation, a little panda bear.
I mostly use two mediums when I paint/shade my creations: pastels and oils.

Pastels & Oils
I have learned the techniques thanks to the generous sharing of some bear artists' experience. Then again, I have learned what works best for me, through trial and error.
This is what I do.
Step 1
With a very thin brush (number 0) I trace the eye contour. Here I use liquid fabric paint. I like to leave a little eye white. I try to be very careful and make symmetrical contours, so that the eye whites are the same in both eyes.

Step 2
I place pins around the ideal contour of my black patches. This will be very helpful as I want the two patches to be symmetrical, and to have a precise shape.

Step 3
I grind some black pastel.
I found out that the best method to obtain pastel powder is to use a very stiff brush and scratch the pastel sides with it from top to bottom. I did my own stiff brush taking a flat stiff brush and cutting its hair almost to the metal end. It works just fine.

Step 4
I prefer to use the pastel powder to paint the eye area that has been made with needle felting. The powder penetrates better into the wool crevices. So I start taking very small amounts of powder with the tip of my smallest brush, and gently apply it to the needle felted area, starting from the outer side of the black eye contour towards the furry areas.


Step 5
Now it is time to use the oils. I use a slightly thicker and stiff brush. I take a very tiny amount of oil paint with the tip of my brush, wipe it several times on a piece of toilet paper. When the brush leaves a very faint trace on the paper, it is ready to do the fur shading.
Before going on the outer edges of my patches, I paint with the oils over the inner area that I have already done with pastels. This is because I want an even patch, and pastels are a different texture from oils. I need them to go deep in the needle felting, but the outer surface will be oil shaded as well.
I shade the patches starting from the eye rim towards the outer edge of my patch, following the fur direction.

Step 6
I remove the pins, and do the final touches. Here I need to see if the symmetry is fine.


And these are pictures of my extreme makeover....before, and after!
Before...

...and after!


Pin It!

giovedì 7 marzo 2013

Dyeing string mohair with Kool-Aid: a TUTORIAL

I have been meaning to do some Kool-Aid dyeing  for some time now. I have done it plenty of times in the past but never kept a visual record. This time I took the time to take some pictures for a small tutorial.
This is how it works for me.
Beware: Kool-Aid works very fine with animal fibers like mohair, silk, alpaca....but IT DOES NOT WORK ON COTTON. The cotton backing of the mohair fabric will remain exactly the same.
What you need:
STRING MOHAIR
-Mohair fabric suitable to be dyed. I have used string mohair, which is mohair that has never been dyed or treated.You can also dye mohair that has already another colour, the end result will be a mix of the two colours.
STAINLESS STEEL POT
-A big stainless steel pot. It must be quite big as the mohair should be move in it with ease.


BERRY BLUE Kool-Aid
- Kool -Aid of your colour choice. If you, like me, live in a country where Kool Aid is not available on the market you can easily buy it on the internet.
This is where I bought mine


WHITE VINEGAR
- White vinegar. It helps fixing the dye on your fabric.


Step 1
- Put your mohair fabric into a plastic container filled with warm water. You can add some soap specific for washing wool fabric.

Step 2
-After about ten minutes rinse your fabric with warm water until there is no more soap residue.

Step 3
- Fill your stainless steel pot with water (about 4 liters), add two cups of vinegar into it, and put it on the stove until it boils.

Step 4
- When the water is boiling, add your Kool-Aid powder and mix well with a metal spoon until it is well dissolved.
I suggest to use one packet at a time.
Step 5
- Keep the stove on, but with a very low 'flame'. The boiling water must be kept hot, but it must be a gentle heat. You can now put your fabric into the water.
Step 6
- With your metal spoon, keep gently moving the fabric around the pot. From time to time, lift a portion out of the water to test how it is coming out.
The mohair sucks up the dye gradually. If you want the color to be more intense, you can always add more Kool-Aid when you see that the mohair has already sucked up all the colour from the water. You can see it because the water is almost back to its normal transparency.
Step 7
-When the mohair has reached the desired colour, take your pot from the stove and with your spoon lift out the fabric. Let it lay in the sink on a drainer for a while, until it has cooled a little.
Step 8
-Rinse your fabric thoroughly with warm water then squeeze it to let out as much water as you can. Do not wring it too tight though.
Here is your mohair, ready to be dried!
Step 9
-You can lay your mohair on an old towel and let it dry naturally, or if you have no patience like me, you can dry it in your drying machine. If you wish to use the machine, be sure to add a couple of old towels together with your mohair piece. I have found that my drying machine can 'feel' that the mohair is too wet, and stops doing its job. If I add towels, she works wonders!
Here is my super soft and bright mohair, ready for a new project!


Pin It!

sabato 26 gennaio 2013

Polymer clay penguin feet- FREE TUTORIAL

As I designed my new pattern for a penguin this month, I devised a way to make and attach polymer clay feet. I wanted to make them of that material to give a more realistic look. I don't know if I found an original way to do it, or if it is already widely known. Be as it may, as it succeeded, I will share my 'experiment' here on the blog.

POLYMER CLAY PENGUIN FEET - TUTORIAL

Step 1
What you need:
-Polymer clay (I use Fimo)

-Two cotter pins, four disks.
The pin and disks sizes depend on the size of your animal. I used 1 1/4 inches (35mm) cotter pins, and 18mm disks. I would suggest to use the longest cotter pin you have, as a part of its length needs to be stuck into the clay.


-Strong glue
-Acrylic paint

-Semi-gloss varnish, suitable for Fimo

-A brush
-Toothpicks

Step 2
Take two chunks from your clay batch, and roll them into identically sized balls. Again, the quantity depends on the size you want your feet to be. You might need to add or subtract material as you work.
Step 3
Insert the two cotter pins into each one of the Fimo balls.
Step 4
With a toothpick, roll some of the material from the edge of the ball, towards the center where the pin is. Smooth it to have an even surface. The head of your cotter pin must be securely embedded into the Fimo ball.
Step 5
Insert a disk in the pin and push it so that it is against the clay.
Step 6
Start sculpting your shape.
The disk should give you the dimension of the leg diameter.
As for the shaping goes, there are no rules, shape the feet as you like!
Some pictures of my sculpting process:
 I mostly do my sculpting with my hands and with the aid of a toothpick. I gently roll it on the clay surface to make it even.
 Remember to check that the two feet are evenly sized, and most of all, that they have the same height from the cotter pin to the base!
Step 7
When you have done with your sculpting, remove the disks.
Now it is baking time! Bake your two feet following the clay instructions.
Here is a foot already baked!
Step 8
Sand both feet with fine sandpaper, then wash and dry them.
Step 9
Now take the glue, put some around the disks hole, and insert the disks back on your legs. Let it dry.
 
Step 10
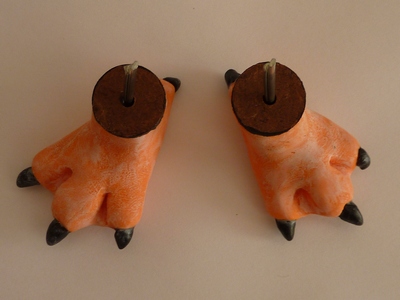
When the glue is dry you can proceed to paint and shade your feet. Again, here it is a matter of preference.
In this instance I have
-applied very little white acrylic with a dry brush, for a very subtle effect, on the whole feet surface
-painted the nails with three layers of black acrylic, then slightly shaded them with white for a 'worn' look
-covered with semigloss varnish, to protect the colours
 I let the feet dry upside down with the pins inserted on a needle felting sponge.


Here is the end result.


I have painted the rim of the cotter pins with black, as the fur of the area where the legs will go is black, and it will blend better.

Step 11
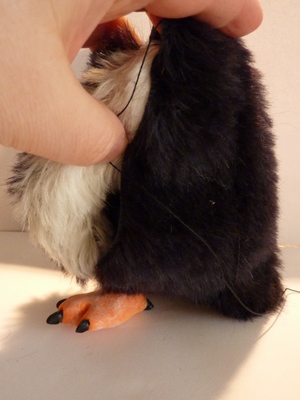
Now your feet are ready to be attached to the body. You can do it as you would with any other limb.
 Here is my next penguin...well, only half of him yet... now, he has feet!


Pin It!